
Help Google Find and Understand Your Website

Congrats on your journey to creating your perfect website to amaze the world! What’s next? How does Google find it? Let’s explore how Google discovers and indexes your pages. Learn how to apply a few simple WordPress settings and use free tools that can help you along the way.
You’ll learn how to submit your sitemap and check whether your pages are indexed. Each step in this article helps you understand what Google can see and where your website may need attention to be noticed.
How Google Discovers, Crawls and Indexes Pages

Meet Googlebot, Google’s automated web crawler. It visits web pages and examines their content. Our little robot represents that software at work.
The journey has three stages:
- Discovery: Google learns that your page exists, often through a link or a sitemap.
- Crawling: Googlebot visits the page and examines its content.
- Indexing: Google processes the page and decides whether to add it to its search index.
Think of the index as Google’s collection of pages that may appear in search results. Discovery starts the journey; indexing makes a page eligible to appear. Google does not index every page, and indexing does not guarantee a high ranking.
WordPress Search Engine Visibility
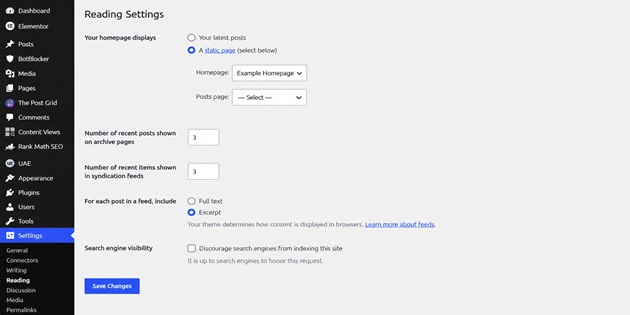
Your first stop is a simple setting in WordPress.
- Open your WordPress dashboard.
- Go to Settings → Reading.
- Find Search Engine Visibility.
- Find the specified checkbox labelled “Discourage search engines from indexing this site.” This is WordPress’s “no index” setting. A checkmark asks search engines not to index your website. If the box is checked, click it to remove the checkmark and leave the box empty.
- If you changed this setting, click Save Changes.
With this box unchecked, WordPress no longer asks search engines to avoid indexing your site. This setting alone does not submit your website to Google or confirm that its pages are indexed.
Google Search Console Ownership Verification
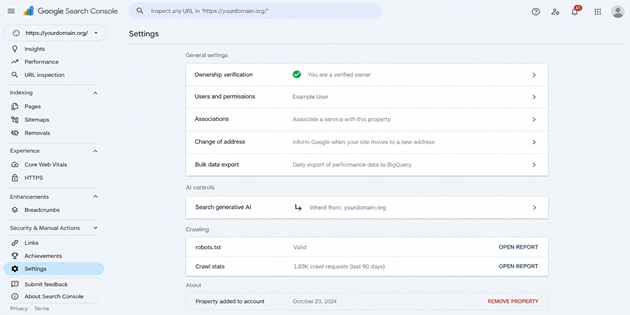
Google Search Console is a free tool with a dashboard that shows your website’s indexing status and provides details to help you understand and resolve indexing issues.
Sign in to Google Search Console with your Google account. If you already use Gmail, sign in with your Gmail address and password. If you don’t have a Google account, create one first. Then open the Search Console dashboard and add your website as a property by entering its full website address—for example, https://www.yourdomain.org/. Replace this example with your own website address. This identifies the website you want to verify and monitor through Google Search Console.
For a straightforward start, choose URL prefix. Enter your full public website address, including https:// and www if your website uses it.
Google will offer ways to verify ownership. Choose the verification method that suits your setup. The HTML tag option can be convenient if your SEO plugin provides a field for Google’s verification code. Keep the tag in place after verification.
Google also offers a Domain option. This lets you check all versions of your website together. To prove you own the domain, Google gives you a code to add to your domain’s settings. If you’re unsure how to add it, your domain provider can help.
After Google confirms ownership, you can open your website’s reports and check which pages are indexed.
.
Submit Your Sitemap to Google
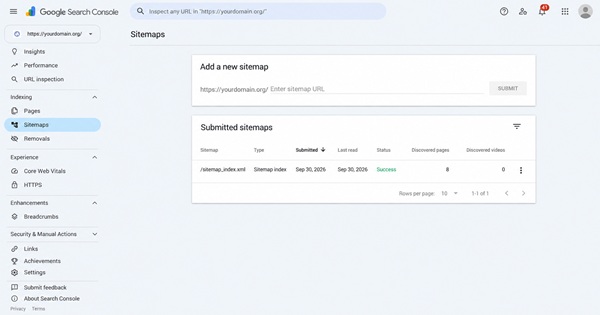
A sitemap lists your website’s page addresses to help search engines discover your content. WordPress can generate this itemized list of URLs for your pages and posts.
An SEO plugin such as Rank Math can help manage search titles, descriptions and sitemaps. Choose one main SEO plugin to keep your setup simple. A plugin is helpful, but Google indexing does not require one.
Your sitemap address depends on your setup. Common examples include:
- Rank Math:
https://yourdomain.org/sitemap_index.xml - WordPress native sitemap:
https://yourdomain.org/wp-sitemap.xml
Replace the example domain with your own. If you use Rank Math, look under Rank Math SEO → Sitemap Settings for the actual sitemap link.
Open your sitemap in a browser first. It may list individual pages or smaller sitemap files containing your posts and pages. Confirm the address your website actually uses.
- In Search Console, select the correct website property.
- Open Sitemaps.
- Enter your actual sitemap address. If the field already includes your website address, enter only the remaining part.
- Click Submit.
- Check the report after Google processes it.
Success means Google fetched and processed that sitemap. It does not confirm that every listed page is indexed. If the sitemap contains smaller sitemaps, check their results too.
Check Your Page With Google URL Inspection
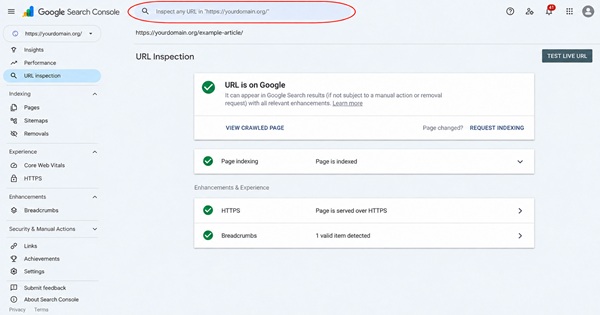
Now you can check an individual page. Paste its full address into the inspection field at the top of Search Console and press Enter.
URL is on Google, together with Page is indexed, confirms that the page is indexed and can appear in search results. The screenshot above shows this indexed result.
If the page is not indexed, read Google’s explanation. Click Test Live URL to check whether Google can currently access the page and whether it appears eligible for indexing.
These two results tell you different things:
- URL is on Google: an indexed result.
- URL is available to Google: a live-test result, which does not confirm indexing.
For a newly created or significantly updated page that passes the live test, you can choose Request Indexing. Then give Google some time to review your page. A request helps bring it to Google’s attention, while indexing and rankings depend on Google’s evaluation. One submitted request is enough; you can check back later to see whether your page has been indexed.
Create Useful Content and Connect Your Pages

Give each page a clear purpose. Introduce the topic, explain what your reader needs to know, and offer useful examples or tips. Descriptive titles and headings help readers follow along.
Links between pages on your own website are called internal links. They help readers explore related information and help Google discover more of your pages.
For example, your article about choosing a laptop could link to your guide about screen sizes. Use descriptive wording such as choosing a screen size so readers know where the link leads.
The image shows a topic introduction, related content and useful tips connected through links. It’s an example of organizing information. You can adapt this approach to suit your own articles.
Keep your information accurate and up to date, add links where they help, and update your pages whenever needed. You’re building something special for people to enjoy and use. These simple steps help Google discover and understand your content and support the indexing process.
Dashboard screenshots use fictional website addresses and anonymized account details for demonstration purposes, making the steps easy to follow while protecting privacy in general.